How to add course content to Canvas Modules
How to add course content to Canvas Modules
- Determine if you want to add new content or content from an old course, then follow the procedure in one of the two sections below before continuing to the next step.
- Go to your course's Home in Bruin Learn
- Click "Modules" in the course navigation menu. You will see the 10 empty modules (named Week 1 - Week 10)
- In the module (Week N) you want to add content to, click "+" at the far right of the module box
- Select and add items
- Publish each item and the module itself as appropriate (this is different from CCLE, where everything was published by default).
Optional step:
- The "Quick Links" table on the Home page contains a shortcut to each weekly module. Whenever you have at least one item in a module, you can update the module's corresponding shortcut in the "Quick Links" table to change the URL to the first item in the module. This will give a different behavior when that shortcut is clicked on (instead of taking you to the entire Modules dump page at a specific week, it will take you to the first item in the week, where you can use the Next/Previous pagers at the bottom to move around).
Add new content
Add content from a previous course
- Go to your course's Home in Bruin Learn
- Click "Import Existing Content" in the right navigation drawer
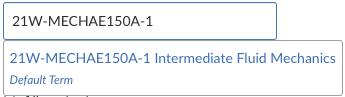
- Set the import options as follows (using 21W-MECHAE150A-1 as an example only):
- Content Type = "Copy a Canvas Course"
- Search for a course = [type in your course number or hit space bar to see all your courses > wait for Search to produce a dropdown > select a course from the dropdown]
- Content = "Select specific content"
- Option = check "Adjust events and due dates" and select Remove dates"
- Date Adjustment = [choose your preference]
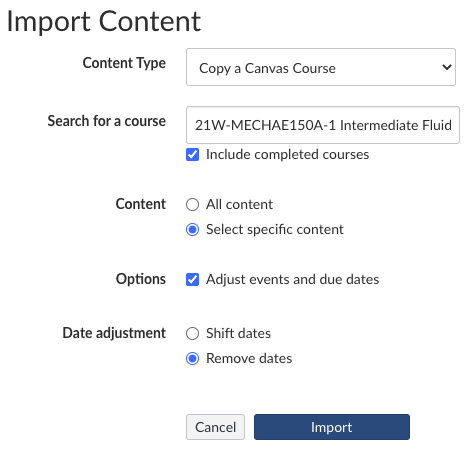
- Click "Import" button
- Click "Select Content"

- Check the content you want, but DO NOT CHECK Course Settings, Syllabus Body, and Modules. For example:
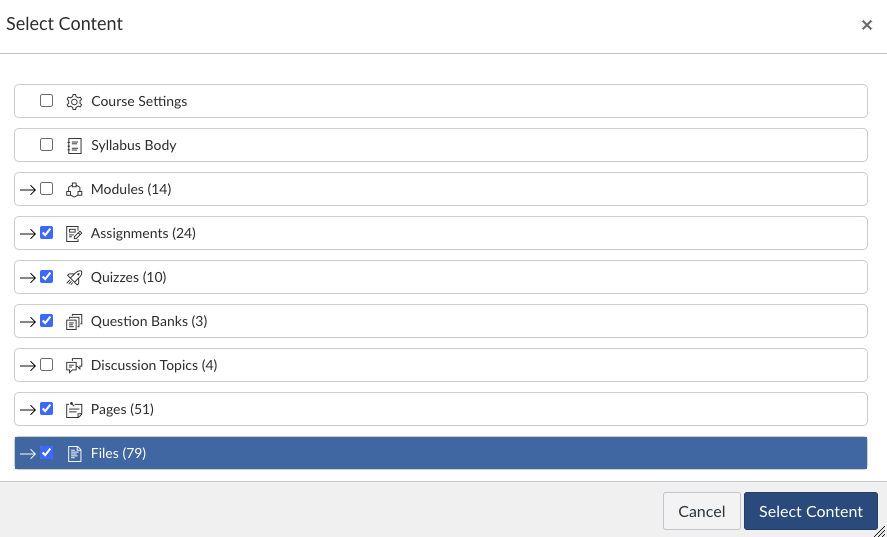
NOTE: You can expand each content type to unselect some items. For example, expand Files and uncheck files that you don't want to copy over.
- Click "Select Content" button
- Wait for the status to change from "Queued" to "Running" to "Completed". Then if you have "N issues", click on it to see the issues.


- Check the imported content (i.e. click Files, Pages, Assignments, etc. in the Course Navigation).
Related Articles
Adding content to Bruin Learn - MSOL
Note: You can find all Bruin Learn resources at https://bruinlearn.ucla.edu/courses/288. MSOL courses are automatically assigned the MSOL course template. Please follow the steps below to prepare your MSOL class site: STEP 1 - update Syllabus STEP 2 ...Adding Content to Bruin Learn
(For MSOL, please visit https://help.seas.ucla.edu/portal/en/kb/articles/adding-content-to-bruin-learn-msol instead.) This guide provides one specific method to help you set up your site content quickly using the SEAS course template. To learn about ...Import/Copy Previous Course Content into a different course
Go to the new site's home page There should be an option that says "Import existing content" Under the "Content Type", select "Copy a Canvas Course" Under "Search for a course", type in the course shortname (24F-SUBJ-###-SEC) Select if you want to ...IT Resources for MSOL
Login: UCLA Logon IDWhere to get help: accounts.iam.ucla.edu or contact UCLA IT Services You will use your UCLA Logon ID to access the following resources: Bruin Learn for class websites Zoom for online office hours ScheduleIt for studio reservations ...Enroll students to a previous course or grant them an extension
For granting access to previous quarters classes: Go to the class in question Go to "Settings" Under "Course Details" go to "Participation" and switch from "Term" to "Course" Under "Start" select the date for yesterday, under "End" select the date ...